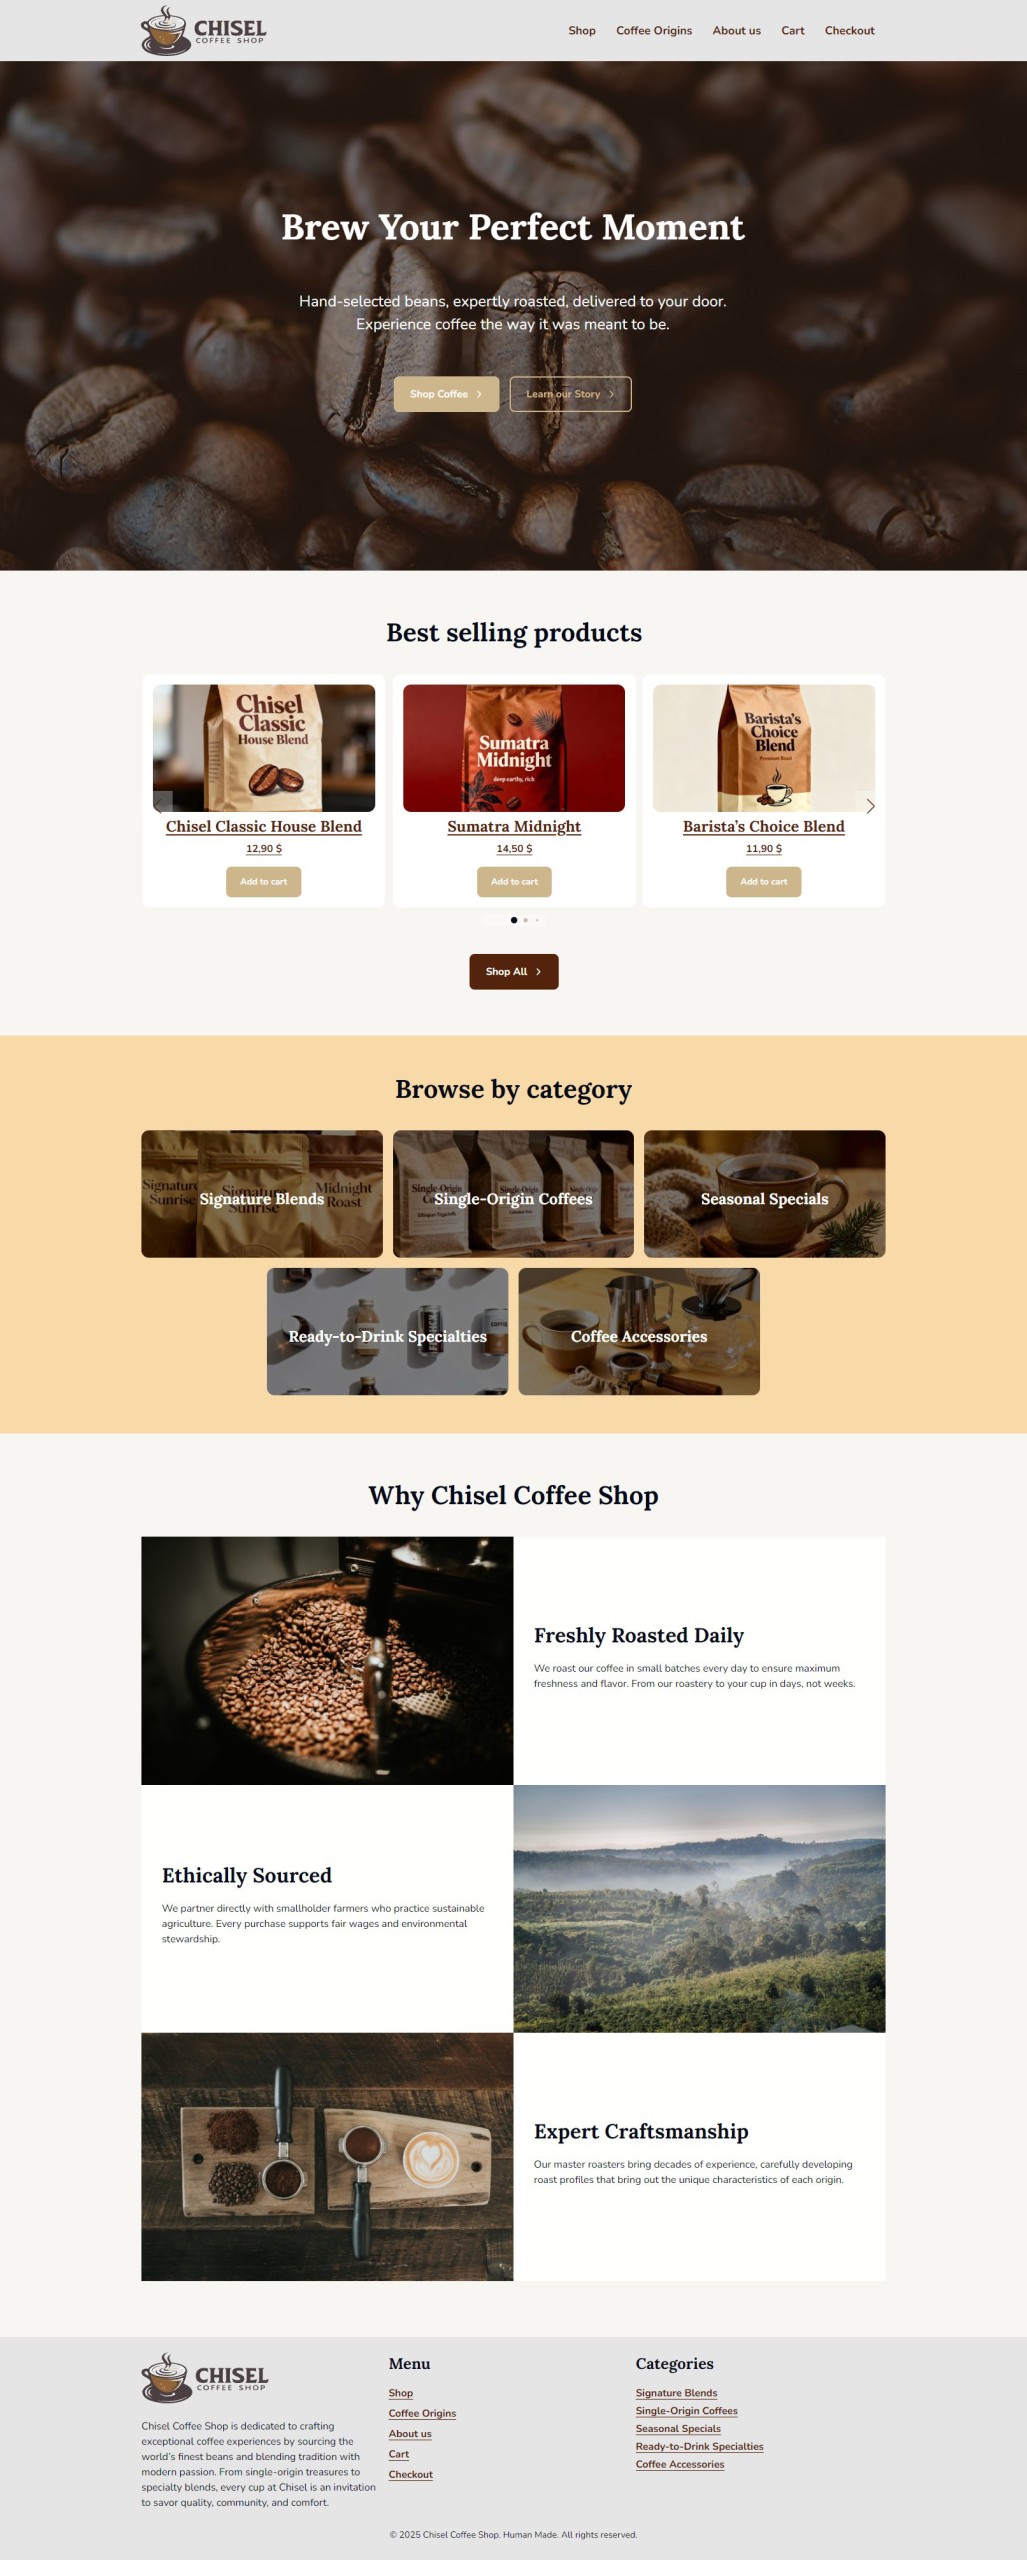
Chapter 3: Home Page with custom blocks
In this section, we’ll build a compelling homepage using WordPress blocks, custom ACF blocks, and WooCommerce integration.
Our homepage will include:
- Hero section with a cover block
- Best Selling Products carousel (custom ACF block)
- Categories grid
- CTA with discount code
- Why Chisel Coffee Shop (3 media-text blocks)
- FAQ section
Page Settings
Under Page tab in the side panel set the page title setting to Hide.
Hero Section (Cover Block)
The hero section makes a bold first impression with a full-width image, headline, and call-to-action.
Instructions:
- Click the “+” button to add a block.
- Search for and add a Cover block.
- Upload a background image:
- Use a high-quality coffee-related image (coffee beans, brewing scene, or shop interior)
- Recommended size: 1920px × 800px
- Set overlay opacity:
- In the block settings sidebar, adjust Opacity to 40-50% so text remains readable
- Change overlay color:
- Set overlay to Primary 800 for brand consistency
- Add content inside the Cover block:
- Click inside and add a Heading block
- Enter: Brew Your Perfect Moment
- Set heading level to H1
- Fonts size: Default
- Align: Center
- Add subtitle:
- Add a Paragraph block below the heading
- Text: Hand-selected beans, expertly roasted, delivered to your door. Experience coffee the way it was meant to be.
- Align: Center
- Add Call-to-Action Buttons:
- Add a Buttons block
- Create two buttons:
- Button 1: “Shop Coffee” → Link to
/shop/- Style: Secondary
- Button 2: “Learn Our Story” → Link to
/about/- Style: Secondary Outline
- Button 1: “Shop Coffee” → Link to
- Align buttons: Center
- Set Cover block height:
- In block settings, set Minimum height to 800px
- Add Spacer blocks below the heading and paragraph with the style set to L
- Save your work.
Best Selling Products Carousel (Custom ACF Block)
We’ll create a custom ACF block to display a carousel of best-selling products.
Create the Custom Block
In order to create a custom ACF block we can simply copy the Slider block and modify the files:
- Rename the folder and the twig file inside to products-carousel
- Remove the acf field group from
acf-jsonfolder - Modify block.json to the following:
{
  "name": "chisel/products-carousel",
  "title": "Products Carousel",
  "description": "Display products carousel.",
  "category": "chisel-blocks",
  "icon": "slides",
  "apiVersion": 3,
  "keywords": ["slider", "carousel", "products"],
  "textdomain": "chisel",
  "acf": {
    "mode": "preview",
    "usePostMeta": false,
    "renderCallback": "\\Chisel\\Helpers\\BlocksHelpers::acf_block_render"
  },
  "supports": {
    "anchor": true,
    "align": ["wide", "full"],
    "alignWide": true,
    "alignContent": false,
    "className": true,
    "customClassName": true,
    "multiple": false,
    "reusable": true
  },
  "ignoreScripts": ["script", "editorScript"],
  "script": "file:./script.js",
  "style": ["file:./style-script.css"],
  "editorScript": "file:./index.js",
  "editorStyle": "file:./index.css"
}- Add the following content in style.scss file:
@use '~design' as *;

.b-products-carousel {
  .swiper {
    padding-bottom: get-padding('huge');
  }

  .swiper-pagination-wrapper {
    bottom: px-rem(20);
  }
}- Create two files for the editor:
editor.scssandindex.js. We will use it to adjust styles in the editor. Since the swiper is loaded only on the front-end we want it to display nicely in the editor, too.
Add the following in theeditor.scssandindex.jsfile:
/**
 * This file is loaded in the editor only.
 *
 * You must import the scss file in order for css file to be built in the build folder.
 */

import './editor.scss';@use '~design' as *;
.b-products-carousel {
.swiper {
opacity: 1;
}
.c-slider__slides {
display: flex;
flex-wrap: nowrap;
gap: px-rem(10);
}
.swiper-slide:nth-child(n + 4) {
display: none;
}
a {
pointer-events: none;
cursor: default;
}
}{% set slides_html = '' %}
{% set has_thumbnails_nav = 'thumbnails' in fields.slider_options.slider_settings %}
<div {{ wrapper_attributes }} data-block-id="{{ block.id }}">
<div class="b-slider__inner alignfull">
{% if fields.products is not empty %}
{% for product in fields.products %}
{% if product.get_thumbnail() %}
{% set slides_html %}
{{ slides_html }}
<div class="b-slider__slide swiper-slide" {% if has_thumbnails_nav %}data-thumbnail-url="{{ get_image(slide.acf_bs_image).src('medium') }}"{% endif %}>
{% include "woocommerce/content-product.twig" with {post: product} %}
</div>
{% endset %}
{% endif %}
{% endfor %}
{% include 'components/slider.twig' with {
slides_html,
params: {
type: 'products',
breakpoints: {
768: {
slidesPerView: 2,
},
1200: {
slidesPerView: 3,
}
},
block_settings: fields.slider_options
}
} %}
{% else %}
{% include 'partials/block-edit-button.twig' with {'block_name': 'products carousel'} %}
{% endif %}
</div>
</div>To create a carousel, we use Chisel’s built-in slider component, which is powered by the Swiper.js library. To set it up, we need to pass slides_html to the component along with any custom parameters.
The slides_html variable must contain slide items with the required swiper-slide class. Once we pass it to the slider component, it is initialized automatically.
Custom parameters can be passed in two ways:
- In Twig – as shown in the example. It supports the same arguments as the Swiper.js library, but there are two additional parameters specific to Chisel:
type– sets the slider type. This can be used to create a custom callback function in JavaScript to define custom parameters there instead of in Twig.block_settings– a special argument that converts ACF settings fields into Swiper arguments.
- In JavaScript – you can define a custom callback function directly in JavaScript (in
src/scripts/modules/slider.js) and set your custom parameters following the format[type]SliderParams, e.g:
productsSliderParams() {
  this.params = {
    ...this.params,
    spaceBetween: 20,
    breakpoints: {
      768: {
        slidesPerView: 2,
      },
      1200: {
        slidesPerView: 3,
      }
    },
  };
}Create Custom Fields
- Custom Fields > Add New in WordPress admin.
- Title: “ACF Block: Products Carousel”
- Add the following fields:
- Slides:
- Type: Accordion
- Products to display
- Type: Select
- Name:
products_to_display - Choices:
- latest : Latest
- selected : Selected
- Return: value
- Products Limit
- Type: Number
- Name:
products_limit - Default value: 10
- Condition: Products to display is equal to Latest
- Products
- Type: Relationship
- Name:
products - Post Type: Product
- Post Status: Published
- Return Format: Post ID
- Condition: Products to display is equal to Selected
- Settings:
- Type: Accordion
- Settings:
- Type: Clone
- Name:
slider_options - Fields: All from Slider Settings field group
- Display: Seamless
- Prefix Field Names
- Slides:
- Set location rule to our new block: Products Carousel. After saving the acf field group should appear in
acf-jsonfolder inside the block
Prepare data for block context
Since our block displays dynamic data based on its settings we need to prepare a nice posts array before displaying them in our twig file. In order to do that let’s use a custom filter provided by Chisel: $context = apply_filters( 'chisel_timber_acf_blocks_data_' . $block_slug, $context );
- Register the filter and a attach a callback in:
custom/app/WP/AcfBlocks.php
/**
	* Register filter hooks.
  */
public function filter_hooks(): void {
	add_filter( 'chisel_acf_options_pages', array( $this, 'register_acf_options_pages' ) );
	add_filter( 'chisel_acf_options_sub_pages', array( $this, 'register_acf_options_sub_pages' ) );

	add_filter( 'chisel_timber_acf_blocks_data_products-carousel', array( $this, 'acf_blocks_data_products_carousel' ) );
}- Create the callback method – we query the posts based on the settings and pass the resulting posts array to the block context:
/**
 * Prepare Products Carousel data.
 *
 * @param array $context
 *
 * @return array
 */
public function acf_blocks_data_products_carousel( array $context ): array {
  $fields = $context['fields'];
  $args   = array(
    'post_type'     => 'product',
    'no_found_rows' => true,
  );

  $products_to_display = $fields['products_to_display'];

  if ( $products_to_display === 'selected' ) {
    $args['post__in'] = $fields['products'] ?? array( 0 );
    $args['orderby']  = 'post__in';
  } else {
    $args['posts_per_page'] = $fields['products_limit'] ?? 10;
  }

  $products_query = Timber::get_posts( $args );

  $fields['products'] = $products_query->to_array();
  $context['fields']  = $fields;

  return $context;
}- Add the block to the homepage with “Best selling products” heading (H2) and a “Shop all” button below.
Products Categories (Custom ACF Block)
Now let us create another custom block for our shop. This time we’ll build a simple categories grid with links to category pages. We’ve already created sample categories in Chapter 2: Woocommerce Setup, now we can display them in our custom block.
- Follow the same steps to create the block as we did with the previous one.
- Add the following contents into the block files:
{
  "name": "chisel/products-categories",
  "title": "Products Categories",
  "description": "Display products categories.",
  "category": "chisel-blocks",
  "icon": "category",
  "apiVersion": 3,
  "keywords": ["products", "categories"],
  "textdomain": "chisel",
  "acf": {
    "mode": "preview",
    "usePostMeta": false,
    "renderCallback": "\\Chisel\\Helpers\\BlocksHelpers::acf_block_render"
  },
  "supports": {
    "anchor": true,
    "align": ["wide", "full"],
    "alignWide": true,
    "alignContent": false,
    "className": true,
    "customClassName": true,
    "multiple": false,
    "reusable": true
  },
  "ignoreScripts": ["script", "editorScript"],
  "script": "file:./script.js",
  "style": ["file:./style-script.css"],
  "editorScript": "file:./index.js",
  "editorStyle": "file:./index.css"
}@use '~design' as *;
.b-products-categories__list {
display: flex;
flex-wrap: wrap;
gap: get-gap('normal');
justify-content: center;
@each $column_no, $column_width in (1: 12, 2: 6, 3: 4, 4: 3, 5: 2) {
&.has-#{$column_no}-columns {
.c-product-item {
width: 100%;
@include bp(small) {
width: get-flex-col-width(6, get-gap('normal'));
}
@include bp(medium) {
width: get-flex-col-width($column_width, get-gap('normal'));
}
}
}
}
}
.b-products-categories {
.c-product-item {
padding: 0;
overflow: hidden;
background-color: transparent;
border: none;
}
.c-product-item__content {
position: relative;
margin: 0;
&::after {
position: absolute;
inset: 0;
z-index: 3;
content: '';
background-color: rgba-color('black', 50%);
}
}
.c-product-item__title {
position: absolute;
top: 50%;
z-index: 4;
width: 100%;
padding: get-padding('normal');
color: get-color('white');
transform: translateY(-50%);
}
.c-product-item__image {
transition: get-transition('slow');
}
.c-product-item__content:hover .c-product-item__image {
transform: scale(1.05);
}
}@use '~design' as *;
.b-products-categories {
.c-product-item {
pointer-events: none;
}
.c-product-item__content {
> img {
display: none;
}
}
}<div {{ wrapper_attributes }} data-block-id="{{ block.id }}">
{% if fields.categories is not empty %}
<div class="b-products-categories__list has-{{ fields.number_of_columns }}-columns">
{% for item in fields.categories %}
{% include "woocommerce/content-product-cat.twig" with {term: item} %}
{% endfor %}
</div>
{% else %}
{% include 'partials/block-edit-button.twig' with {'block_name': 'products categories'} %}
{% endif %}
</div>Create Custom Fields
- Custom Fields > Add New in WordPress admin.
- Title: “ACF Block: Products Categories”
- Add the following fields:
- Categories:
- Type: Taxonomy
- Name:
categories_ids - Return: Term ID
- Number of columns
- Type: Range
- Name:
number_of_columns - Default value: 3
- Minimum Value: 1
- Maximum Value: 5
- Categories:
- Set location rule to our new block: Products Categories. After saving the acf field group should appear in
acf-jsonfolder inside the block
Prepare data for block context
We can prepare data the same way we did for Products Carousel block, using a filter with a custom callback:
- Register the filter
/**
 * Register filter hooks.
 */
public function filter_hooks(): void {
	add_filter( 'chisel_acf_options_pages', array( $this, 'register_acf_options_pages' ) );
	add_filter( 'chisel_acf_options_sub_pages', array( $this, 'register_acf_options_sub_pages' ) );

	add_filter( 'chisel_timber_acf_blocks_data_products-carousel', array( $this, 'acf_blocks_data_products_carousel' ) );
	add_filter( 'chisel_timber_acf_blocks_data_products-categories', array( $this, 'acf_blocks_data_products_categories' ) );
}- Add the method:
/**
 * Prepare Products Catgeories data.
 *
 * @param array $context
 *
 * @return array
 */
public function acf_blocks_data_products_categories( array $context ): array {
	$fields = $context['fields'];

	if ( ! empty( $fields['categories_ids'] ) ) {
		$fields['categories'] = Timber::get_terms(
			array(
				'taxonomy' => 'product_cat',
				'include'  => $fields['categories_ids'],
			)
		);
	}

	$context['fields'] = $fields;

	return $context;
}- Add the block to the home page with “Browse by category” heading (H2).
- Wrap the block in the Group block with Full width and Secondary 300 color as well as add Spacer (L) blocks above and below the categories block
Go Wild!
Feel free to add some more blocks to make the home page look more interesting. I added one more section called “Why Chisel Coffee Shop” with the Features 01 pattern, which displays 3 Media Text blocks and creates a nice features list.
Preview
Here’s what the homepage should look like.